
How to Blur a Face in a Photo, Free (or Pixelate It)
Share a group photo, a rental listing, or a screenshot with a stranger in the background, and you just published someone's face…
Read article
Post a photo online and within minutes it can be screenshotted, cropped, and reposted with someone else’s name on it. A watermark is the cheapest insurance against that. It stamps your name, logo, or website onto the picture so the credit travels wherever the image goes. Below you will see how to add a watermark to your photos the fast way, right in your browser, plus where to place it and how strong to make it so it actually holds up. Follow along with the free watermark image tool from Pixellize, no install, no sign-up.
Not every method fits every person. A wedding photographer exporting 400 images needs batch presets. A reseller posting one product photo to WhatsApp needs something that takes ten seconds. Here is how the common options stack up.
| Method | Best for | Cost | Batch | Learning curve |
|---|---|---|---|---|
| Browser tool (Pixellize) | Quick single images, privacy | Free | One at a time | None |
| Photoshop | Precise, designed marks | Paid | Yes, with actions | High |
| Lightroom | Photographers exporting sets | Paid | Yes, on export | Medium |
| Phone app | Posting on the go | Free or paid | Varies | Low |
A watermark is a name, logo, or line of text placed over a photo so viewers know who made it. It does two jobs. It keeps your credit attached when the image gets shared, and it makes the photo annoying enough to steal that most people move on to an easier target.
Here is the honest part. A watermark is a deterrent, not a lock. Someone determined can crop a corner mark or clone it out. What it stops is the casual grab, the reposted screenshot, the “I found it on Google” reuse. For most creators and small businesses in India selling on Instagram and WhatsApp, that casual layer is exactly the theft that happens every day.
A text watermark is the fastest choice. Type your name, a copyright line, or your website, pick a font, and you are done. It is always readable and works at any size. Use it when you want quick, no-fuss attribution.
A logo watermark carries your brand instead of just your name. It looks more finished on product shots and portfolios, but you need a clean logo file, ideally a transparent PNG. With Pixellize you can do both, add a text line, then drop in a logo, and position each one on its own. If your logo needs plain text styled nicely first, the add text to image tool handles that in the same way.
The browser route is the one most people should start with. Nothing installs, nothing uploads to a server, and the whole thing takes under a minute. Open the Pixellize watermark image tool and follow these steps.
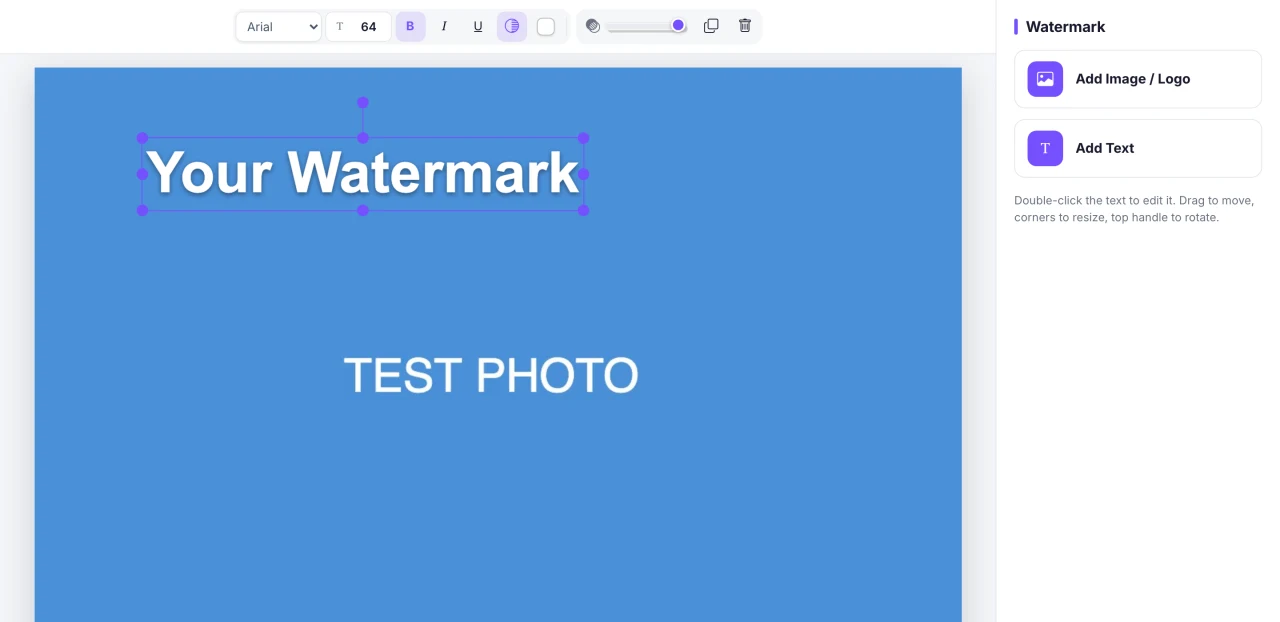
Because everything runs on your device, this also works when you are offline after the page has loaded, and your photo never leaves your computer or phone. That privacy point matters more than people think when the image is a client proof or an unreleased product.
Place a watermark over or near the main subject, not tucked in a corner. A corner mark takes seconds to crop out. A mark across the important part of the photo cannot be removed without damaging the image. Tiling a faint mark across the whole frame is the strongest option of all.
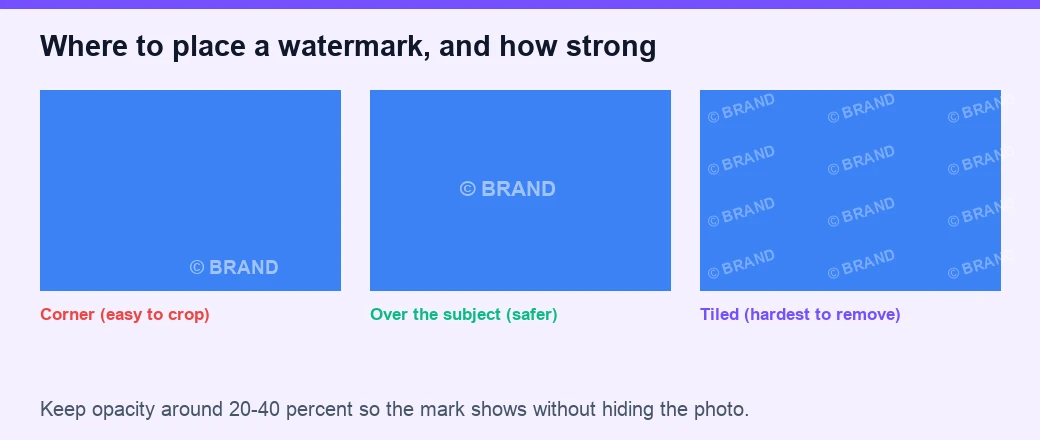
Keep in mind that placement is a trade-off with looks. A mark over the subject protects best but distracts most, so for a portfolio you might accept a lighter corner mark and rely on lower resolution instead. For price lists and offer images you are posting to sell, protection wins, so go bolder.
Set watermark opacity between 20 and 40 percent for most photos. That range keeps the mark clearly visible so it still claims the image, while letting the photo underneath show through cleanly. Go higher, near 60 percent, only when theft protection matters more than looks, and lower, near 15 percent, for subtle branding on a portfolio.
A quick test: glance at the image the way a stranger would. If your eye lands on the watermark before the photo, it is too strong. If you have to hunt for it, bump it up a little. Pixellize shows the change live, so you can nudge the slider until it feels right.
You do not need an app. The Pixellize watermark tool runs in your phone browser, so you can open the page, add your photo from the gallery, drag the watermark with your finger, resize it from the corners, and download the PNG straight to your camera roll. That is handy when you are listing something for sale and want the mark on before you post.
Dedicated apps like PhotoDirector do add batch features and templates, which help if you watermark dozens of images a day. For a few photos at a time, the browser is quicker and keeps your gallery private.
If you shoot professionally and export hundreds of files, desktop software earns its price. Photoshop lets you save a watermark as a custom brush and stamp it precisely, and Lightroom applies a saved watermark on export across an entire set. Guides from ExpertPhotography and Adobe walk through both, and photographers often keep a mark between 500 and 1000 pixels wide for consistency.
The catch is cost and time. Both are subscriptions, and both take real setup before your first watermark. If you are not exporting in bulk, that overhead is hard to justify when a free browser tool does the same single-image job in seconds.
One more tip from posting a lot of images myself: keep a single watermark style and reuse it. Consistency is what turns a mark into a recognizable brand instead of random text. If you also blur or clean up backgrounds first, the blur photo background guide pairs well with this workflow.
Knowing how to add a watermark to your photos is a five-minute skill that saves hours of chasing stolen images later. Add a text line or a logo, place it over the part that matters, keep the opacity in the 20 to 40 percent range, and download. That is the whole routine. Open the free Pixellize watermark image tool, drop in your next photo, and stamp it before you share. Your work should carry your name wherever it travels.
Open a free browser tool like Pixellize, upload your photo, and a text watermark appears on the canvas. Double-click to edit the text or add a logo, set the color and opacity, drag it into place, and click download. It runs in your browser, so nothing uploads and no sign-up is needed.
Between 20 and 40 percent works for most photos. That keeps the watermark visible enough to claim the image while the photo underneath still shows clearly. Push it toward 60 percent when protection matters most, or down near 15 percent for subtle branding on a portfolio.
Over the subject is safer. Corner watermarks are the easiest to crop out in seconds. A mark placed across the important part of the image, or tiled faintly across the whole frame, cannot be removed without wrecking the photo, which is exactly what you want for protection.
Yes. The Pixellize watermark tool runs in any mobile browser. Add your photo from the gallery, drag the watermark with your finger, resize it from the corners, and download the PNG straight to your camera roll. No app install is required.
It stops casual theft, which is most theft. A watermark keeps your credit attached and makes an image annoying enough to reuse that people find an easier target. A determined editor can still remove a weak corner mark, so place it over the subject and keep the opacity reasonable.
Text is faster and always readable, ideal for a name, copyright line, or website. A logo looks more polished on product shots and portfolios but needs a clean transparent file. You can use both on the same image, one for attribution and one for branding.

Founder of Pixellize. I build free, browser-first online tools that solve everyday digital problems without the friction of accounts, watermarks, or paid tiers. Reach me at [email protected] with feedback or tool ideas.