I once sent a photo to a print shop that looked perfect on my laptop, and it came back soft and pixelated. The file was 72 DPI. The screen never told me, because screens do not care about DPI, but the printer did. That gray, fuzzy 8×10 taught me to always check first. The quickest way to check the DPI of an image is to read the resolution value stored in its file, and you can do it in seconds on any device. Our free Image DPI Checker reads it for you, and this guide covers that plus four other ways, so you know a photo is print-ready before you hit send.
| DPI | Print quality | Best for |
|---|---|---|
| 300+ DPI | Print ready | Photos, flyers, magazines |
| 150 to 299 DPI | Good | Posters, large prints viewed from afar |
| 72 to 149 DPI | Screen only | Web, social, email |
| Under 72 DPI | Very low | Avoid printing |
What does DPI mean on an image?
DPI stands for dots per inch, the number of ink dots a printer lays down per inch of paper. On a digital image the stored DPI value, sometimes called PPI, tells a printer how large to print each pixel. A higher DPI means a smaller, sharper print.
Here is the part that trips people up. DPI and PPI get used interchangeably, but they are not quite the same. PPI (pixels per inch) describes the digital file. DPI (dots per inch) describes the printed output. In everyday use, and in almost every tool you will touch, the two numbers are treated as one. What actually matters is simple: how many pixels you have, spread across how many inches of paper.
5 ways to check the DPI of an image
You can check the DPI of an image five ways, and you do not need expensive software for any of them. Windows and Mac both show it in built-in tools. An online Pixellize checker is fastest. Photoshop is there if you already own it. And on a phone or Chromebook, a browser tool fills the gap. Here they are.
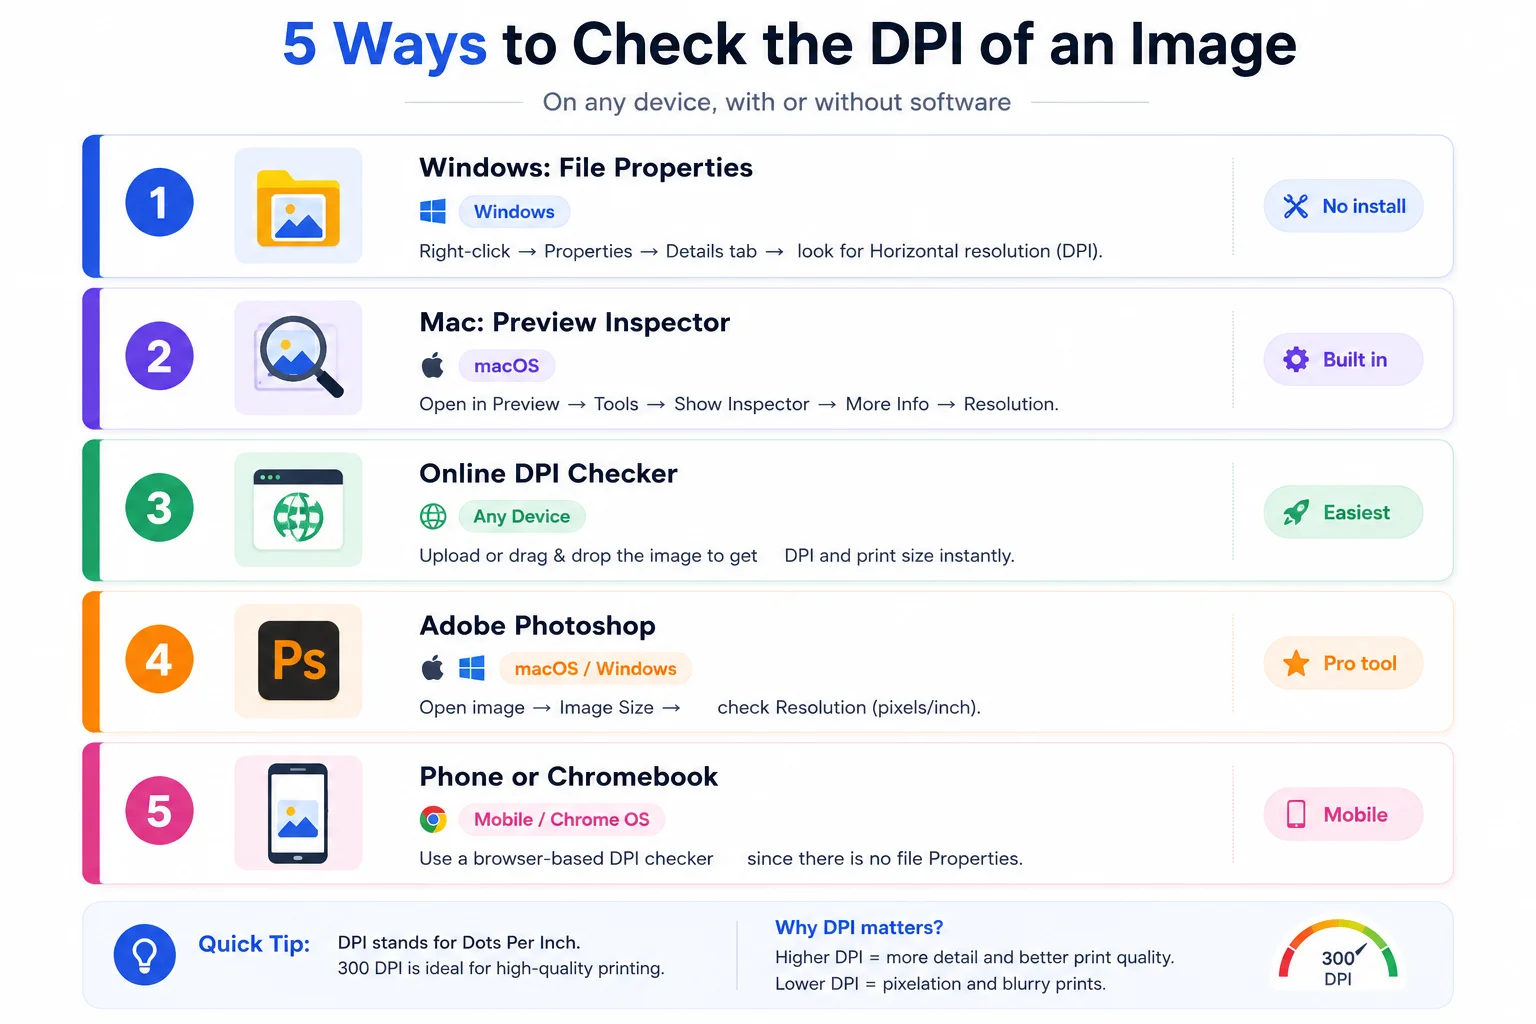
Method 1: Windows File Properties
No download needed. Right-click the image file, choose Properties, open the Details tab, and scroll to the Image section. You will see Horizontal resolution and Vertical resolution, both listed in DPI. They almost always match. If they read 96 or 72, the file carries no print resolution and Windows is showing its screen default.
Method 2: Mac Preview Inspector
On a Mac, open the image in Preview, click Tools, then Show Inspector. In the More Info tab you will find a Resolution field showing the DPI, alongside the pixel dimensions and color profile. It is the fastest native route on macOS, no extra app required. Keep in mind Preview reports what is stored in the file, so a screenshot will usually show 72.
Method 3: An online DPI checker
This is the one I reach for, because it skips the menu-digging and tells you straight away whether the image is print-ready. Open the Pixellize Image DPI Checker, drop your file on the page, and it reads the EXIF resolution and shows the DPI, the pixel dimensions, the file size, and a plain-English rating. Here is what it looks like.

It supports JPG, PNG, WebP, GIF, BMP, and TIFF. The file is read for its metadata and discarded right away, so a private photo or a client proof never gets stored. Pixellize built it this way on purpose, the same as our other in-browser tools.
Want the answer now? Drop your file into the free Pixellize DPI Checker and see the DPI plus a print-ready rating in one click.
Method 4: Adobe Photoshop
If you own Photoshop, open the image, go to Image, then Image Size. The Resolution field shows the DPI in pixels per inch. This is also where you would change it, though raising the number without adding pixels just spreads the same detail thinner. Photoshop is overkill for a quick check, but handy when you are already editing.
Method 5: On a phone or Chromebook
Phones and Chromebooks have no File Properties dialog, which is exactly why people get stuck. The fix is a browser-based checker. Open the image in a DPI checker on the web, and it reads the same metadata your computer would. This is the only route that works the same on iPhone, Android, Chromebook, and desktop, which is why a Pixellize online checker is the safest universal answer.
What DPI do you need for printing?
For most printing you need 300 DPI at the final print size. That is the standard for sharp photos, flyers, and magazines viewed at arm’s length. Large format prints like banners and posters can drop to 150 DPI, because you view them from several feet away.
The phrase “at the final print size” is the catch. A 1200 by 1800 pixel photo is 300 DPI at 4 by 6 inches, but only 150 DPI if you blow it up to 8 by 12. Same pixels, bigger paper, lower DPI. So a number on its own means little until you tie it to a print size. Adobe’s own guide to DPI walks through the same math if you want the long version. If your photo falls short, you usually need a bigger source file, not a higher DPI setting.
How is DPI stored in an image file?
DPI is not part of the picture itself, it is a small tag tucked into the file’s metadata. JPG and TIFF files keep it in the EXIF block, in fields called XResolution and YResolution. PNG files use a chunk named pHYs. When that tag is missing, which happens often with screenshots and web downloads, software falls back to a default of 72 DPI.
That default is why a perfectly sharp 4000 pixel photo can report 72 DPI. The pixels are all there. The file just never recorded an intended print size. The Pixellize checker reads the real tag when it exists and is honest about the fallback when it does not, so you are not fooled into thinking a large image is low quality. If you also need to shrink or resize that file afterward, our image resize tool handles it without quality loss.
Does DPI matter for web images?
DPI does not matter for web images. Screens display images by pixel count, not DPI, so a 72 DPI and a 300 DPI file of the same pixel dimensions look identical on a monitor. For web, only the pixel width and height and the file size affect how the image appears and loads.
This catches a lot of people who were told to “save for web at 72 DPI.” The DPI number does nothing on screen. What helps page speed is smaller pixel dimensions and a modern format. If you are optimizing images for a site, the Pixellize breakdown of the best image format for web matters far more than any DPI setting. For print uploads to forms, though, DPI is often a hard requirement, which our guide on photo size for online forms covers in detail.
Common mistakes when checking DPI
- Trusting the 72 default. A 72 DPI reading often means the tag is missing, not that the image is low quality. Check the pixel dimensions before you panic.
- Reading DPI without a print size. DPI only means something at a specific print size. The same file is 300 DPI small and 150 DPI large.
- Raising DPI to fix sharpness. Bumping the DPI number in an editor does not add detail. You need more pixels, which means a bigger original.
- Worrying about DPI for the web. On screens it does nothing. Focus on pixel size and file weight instead.
- Checking a screenshot. Screenshots almost always carry 72 DPI, so they look low even when the content is fine.
Did you know most camera photos already store 72 DPI by default, even at 24 megapixels? The resolution is enormous, the DPI tag just was not set. That is exactly why checking pixel dimensions alongside DPI saves you from tossing a perfectly good image.
Check before you print
Now you can check the DPI of an image five ways, from File Properties to Preview to a one-click online checker. For a fast, honest answer that also rates print readiness, the browser route wins: free, private, and it works on every device. Drop your file into the Pixellize Image DPI Checker and you will know in a second whether it is ready for the printer. And if it falls short, that is a sign to find a higher-resolution original, not to fake the number. For more image know-how, our guide on extracting images from a PDF is a good next read.